服务器Slurm的使用
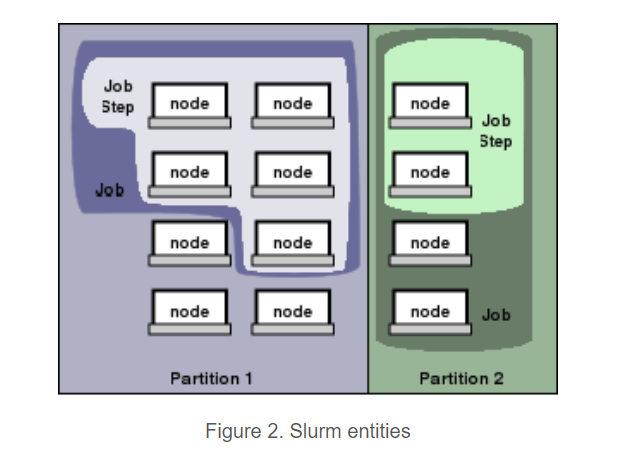
Slurm服务器的常用概念
--ntasks对应 进程(Process),即设定脚本在几个并行任务中 同时执行。可以进一步更改--ntasks-per-node来设定每个node的进程数。默认是一个node的每一个task一个进程--cpus-per-task(-c)实际设定的是 线程(Thread)数task:即 process ,进程,通过设定
--ntasks即设定了pytorch中的 world sizetasks:任务数,单个作业(job)或作业步(job step)可有多个任务,一般一个任务需一个CPU核,
可理解为所需的CPU核数。job: 即在一段时间内分配给一个用户的资源。一条srun指令或者一条salloc + shell 文件 或者一个sbatch指令就是 一个job
job steps:每一个job中可以有子命令,即step。最直观的例子,就是多线程应用,在shell文件中有 多条srun语句, 则每一条srun语句都对应一个step。
下面的例子中,可以看到
-n指定tasks对sbatch并不起效(只运行了一次,并没有运行两次),虽然 给主joob分配了两个CPU,因此下面的脚本才能得以运行(tfpt_py3) [weitaotang@bcm shell_script]$ cat test_multiprocess.sh #!/bin/sh echo JOB $SLURM_JOB_ID CUDA_VISIBLE_DEVICES=$CUDA_VISIBLE_DEVICES srun --gres=gpu:2 -n1 --exclusive ./show_device.sh & srun --gres=gpu:1 -n1 --exclusive ./show_device.sh & wait (tfpt_py3) [weitaotang@bcm shell_script]$ sbatch --gres=gpu:3 -n2 test_multiprocess.sh Submitted batch job 9442 (tfpt_py3) [weitaotang@bcm shell_script]$ cat slurm-9442.out JOB 9442 CUDA_VISIBLE_DEVICES=3,4,6 JOB 9442 STEP 0 CUDA_VISIBLE_DEVICES=3 JOB 9442 STEP 1 CUDA_VISIBLE_DEVICES=4,6 (tfpt_py3) [weitaotang@bcm shell_script]$ sacct -j 9442 JobID JobName Partition Account AllocCPUS State ExitCode ------------ ---------- ---------- ---------- ---------- ---------- -------- 9442 test_mult+ defq users 2 COMPLETED 0:0 9442.batch batch users 2 COMPLETED 0:0 9442.0 show_devi+ users 1 COMPLETED 0:0 9442.1 show_devi+ users 1 COMPLETED 0:0若在sbatch时 不显式地分配两个task,会报错
(tfpt_py3) [weitaotang@bcm shell_script]$ sbatch --gres=gpu:3 test_multiprocess.sh
Submitted batch job 9443
(tfpt_py3) [weitaotang@bcm shell_script]$ sacct -j 9443
       JobID    JobName  Partition    Account  AllocCPUS      State ExitCode
------------ ---------- ---------- ---------- ---------- ---------- --------
9443         test_mult+       defq      users          1  COMPLETED      0:0
9443.batch        batch                 users          1  COMPLETED      0:0
9443.0       show_devi+                 users          1  COMPLETED      0:0
9443.1       show_devi+                 users          1  COMPLETED      0:0
(tfpt_py3) [weitaotang@bcm shell_script]$ cat slurm-9443.out
JOB 9443 CUDA_VISIBLE_DEVICES=3,4,6
JOB 9443 STEP 0 CUDA_VISIBLE_DEVICES=3
srun: Job 9443 step creation temporarily disabled, retrying
srun: Step created for job 9443
JOB 9443 STEP 1 CUDA_VISIBLE_DEVICES=3,4
20200203 update
参考:
- 依旧是先看 quick start Quick Start User Guide
- Job Launch Design Guide一个对整个流程简单的描述,可以看看
- How do the terms “job”, “task”, and “step” relate to each other?,推荐!举了一个简单的例子来说明
- How to submit parallel job steps with SLURM?,一个有问题的例子,也不错
- What does the –ntasks or -n tasks does in SLURM?,解释了
ntasks的含义,虽然没有直接说明task到底是什么,但是可以大概理解
首先根据quick start
nodes, the compute resource in Slurm,
partitions, which group nodes into logical (possibly overlapping) sets
jobs, or allocations of resources assigned to a user for a specified amount of time
job steps, which are sets of (possibly parallel) tasks within a job
The partitions can be considered job queues, each of which has an assortment of constraints such as job size limit, job time limit, users permitted to use it, etc. Priority-ordered jobs are allocated nodes within a partition until the resources (nodes, processors, memory, etc.) within that partition are exhausted.
Once a job is assigned a set of nodes, the user is able to initiate parallel work in the form of job steps in any configuration within the allocation.
For instance, a single job step may be started that utilizes all nodes allocated to the job, or several job steps may independently use a portion of the allocation.
可以看到在quick start里面是没有对task的描述
根据参考2,大概是这样的关系:job > job steps > tasks
A job consists in one or more steps, each consisting in one or more tasks each using one or more CPU.
Jobs are typically created with the
sbatchcommand, steps are created with thesruncommand, tasks are requested, at the job level with--ntasksor--ntasks-per-node, or at the step level with--ntasks. CPUs are requested per task with--cpus-per-task. Note that jobs submitted withsbatchhave one implicit step; the Bash script itself.Assume the hypothetical job:
#SBATCH --nodes 8
#SBATCH --tasks-per-node 8
# The job requests 64 CPUs, on 8 nodes.

# First step, with a sub-allocation of 8 tasks (one per node) to create a tmp dir.
# No need for more than one task per node, but it has to run on every node
srun --nodes 8 --ntasks 8 mkdir -p /tmp/$USER/$SLURM_JOBID

# Second step with the full allocation (64 tasks) to run an MPI
# program on some data to produce some output.
srun process.mpi <input.dat >output.txt

# Third step with a sub allocation of 48 tasks (because for instance
# that program does not scale as well) to post-process the output and
# extract meaningful information
srun --ntasks 48 --nodes 6 --exclusive postprocess.mpi <output.txt >result.txt &

# Four step with a sub-allocation on a single node (because maybe
# it is a multithreaded program that cannot use CPUs on distinct nodes)
# to compress the raw output. This step runs at the same time as
# the previous one thanks to the ampersand `&`
OMP_NUM_THREAD=12 srun --ntasks 12 --nodes 1 --exclusive compress output.txt &

wait
Four steps were created and so the accounting information for that job will have 5 lines; one per step plus one for the Bash script itself.
参考5中的说法:
#!/bin/bash

#SBATCH --ntasks=2

srun --ntasks=1 sleep 10 &
srun --ntasks=1 sleep 12 &
wait
Each task inherits the parameters specified for the batch script. This is why
--ntasks=1needs to be specified for each srun task, otherwise each task uses--ntasks=2and so the second command will not run until the first task has finished.Another caveat of the tasks inheriting the batch parameters is if
--export=NONEis specified as a batch parameter. In this case--export=ALLshould be specified for each srun command otherwise environment variables set within the sbatch script are not inherited by the srun command.Additional notes:
When using bash pipes, it may be necessary to specify –nodes=1 to prevent commands either side of the pipes running on separate nodes.
When using&to run commands simultaneously, thewaitis vital. In this case, without thewaitcommand, task 0 would cancel itself, given task 1 completed successfully.
结合上面这些例子,大概可以理解为:
- task:我们真正需要解决的“任务”,即每次执行的最细粒度,在并行计算中,显然就是最小的一次执行。默认情况(
-c, --cpus-per-task = 1的情况)下,一个task就是一个cpu - job step:可以简单地理解为每个
salloc所运行的或者sbatch脚本中的一条srun就是一个job step了,因为一条srun就已经会对应一个jobid,而每个job step也即每条srun指令都可以执行多个task,通过-n, --ntasks指定每个job要执行的task个数,在默认情况(-c, --cpus-per-task = 1的情况)下,即对应每个job所需的cpu数 - job:可以理解为一个
salloc任务 或者 一个sbatch脚本 或者 直接执行的一条srun指令(比如srun --pty bash使用交互式的bash),每个job都可以包含多个job step(即嵌套的srun)
Slurm 服务器使用常用命令
支持interactive mode的bash:–pty
srun --gres=gpu:2 --pty python xxx.py这样的话,python中的ipdb等模块就能正常起效了,python自身的补全等功能也实现
salloc srun sbatch区别
What is the difference between the sbatch and srun commands?
salloc只分配资源,srun先分配资源并且执行命令(如果不是实现确定好的话)- srun主要是为了interactive use,sbatch则是批量执行,并且支持job arrays
直接参考man解释:
srun:Run a parallel job on cluster managed by Slurm. If necessary, srun will first create a resource allocation in which to run the parallel job.
salloc:Obtain a Slurm job allocation (a set of nodes), execute a command, and then release the allocation when the command is finished.
srunwill add your resource request to the queue. When the allocation starts, a new bash session will start up on one of the granted nodes.
sallocfunctions similarlysrun --pty bashin that it will add your resource request to the queue. However the allocation starts, a new bash session will start up on the login node. This is useful for running a GUI on the login node, but your processes on the compute nodes.
显然如果是想在管理节点上有一些输入,但是把计算放在计算节点,这个就很有用。注意salloc只是预先划分资源,并不一定马上执行你真正要执行的计算命令
嵌套srun运行并不可行
直接嵌套会导致 子任务(job step) 无法运行。
正确的做法是把srun写在shell脚本中,用salloc来运行,或者直接运行bash脚本(如果里面没有多线程的要求的话)
(tfpt_py3) [weitaotang@bcm shell_script]$ cat test2.bash
#!/bin/bash
# echo JOB $SLURM_JOB_ID CUDA_VISIBLE_DEVICES=$CUDA_VISIBLE_DEVICES
echo JOB $SLURM_JOB_ID CUDA_VISIBLE_DEVICES=$CUDA_VISIBLE_DEVICES
srun --gres=gpu:2 -n1 --exclusive ./show_device.sh &
#METHOD=cpu_forward srun --gres=gpu:1 -n1 --exclusive ./show_device.sh &
srun --gres=gpu:1 -n1 --exclusive ./show_device.sh &
#srun --gres=gpu:1 -n1 --exclusive ./show_device.sh &
wait
(tfpt_py3) [weitaotang@bcm shell_script]$ salloc --gres=gpu:3 -n2 ./test2.bash
salloc: Granted job allocation 9430
JOB 9430 CUDA_VISIBLE_DEVICES=
srun: Step created for job 9430
srun: Step created for job 9430
JOB 9430 STEP 0 CUDA_VISIBLE_DEVICES=3,4
JOB 9430 STEP 1 CUDA_VISIBLE_DEVICES=6
salloc: Relinquishing job allocation 9430
(tfpt_py3) [weitaotang@bcm shell_script]$
可以看到上面的例子中,由于 运行该bash文件时并没有用srun,而是直接运行了,因此此时对于主任务来说是没有available GPU的
srun(salloc)的常用arguments
-n, –ntasks=:运行<number>个任务(运行<number>个任务)
-n, –ntasks=<*number*>
Specify the number of tasks to run. Request that srun allocate resources for ntasks tasks. The default is one task per node, but note that the –cpus-per-task option will change this default. This option applies to job and step allocations.
-n, –ntasks=<number>:运行<number>个任务,默认一个节点一个作业(job),注意是所需总CPU核数。仅对作业起作用,不对作业步(job steps)起作用。即把对应的执行的指令运行n次
SLURM_PROCID :可理解为子进程的相对ID SLURM_TASK_PID 则是在系统中实际的PID
SLURM_PROCID:
The MPI rank (or relative process ID) of the current process.
即并行运算时,各个线程独有的PID,一般从0开始
SLURM_TASK_PID
The process ID of the task being started.
则是每个子进程在系统的实际的PID
gres=<list> 是针对每个node来讲的
来自srun的documentation:
The specified resources will be allocated to the job on each node.
因此,下面的命令等价于在每个node上都分配两个GPU,然后即总共申请了 四个GPU
srun --gres=gpu:2 -N2下面的例子可以看到,申请了两个node之后,会默认把Process数变成2,同时把两个程序同时在两个node中运行(并行计算),并且每个node有gres数的gpu:
(tfpt_py3) [weitaotang@bcm distributed_training]$ cat view_multinode.py
import os
print('SLURM_NTASKS:{}'.format(os.environ['SLURM_NTASKS']))
print('SLURM_NODEID:{}'.format(os.environ['SLURM_NODEID']))
print('SLURM_PROCID:{}'.format(os.environ['SLURM_PROCID']))
print('SLURM_LOCALID:{}'.format(os.environ['SLURM_LOCALID']))
print('SLURM_STEP_NODELIST:{}'.format(os.environ['SLURM_STEP_NODELIST']))
print('CUDA_VISIBLE_DEVICES:{}'.format(os.environ['CUDA_VISIBLE_DEVICES']))
print('='*70)
(tfpt_py3) [weitaotang@bcm distributed_training]$ srun --gres=gpu:2 -N2 python view_multinode.py
SLURM_NTASKS:2
SLURM_NODEID:1
SLURM_PROCID:1
SLURM_LOCALID:0
SLURM_STEP_NODELIST:node[01-02]
CUDA_VISIBLE_DEVICES:0,3
======================================================================
SLURM_NTASKS:2
SLURM_NODEID:0
SLURM_PROCID:0
SLURM_LOCALID:0
SLURM_STEP_NODELIST:node[01-02]
CUDA_VISIBLE_DEVICES:0,1
======================================================================
(tfpt_py3) [weitaotang@bcm distributed_training]$
–exclusive 常用于保证每个job step都能够独占资源,不会互相影响
–exclusive[=user|mcs]
This option applies to job and job step allocations, and has two slightly different meanings for each one. When used to initiate a job, the job allocation cannot share nodes with other running jobs (or just other users with the “=user” option or “=mcs” option). The default shared/exclusive behavior depends on system configuration and the partition’s OverSubscribe option takes precedence over the job’s option.
This option can also be used when initiating more than one job step within an existing resource allocation (default), where you want separate processors to be dedicated to each job step. If sufficient processors are not available to initiate the job step, it will be deferred. This can be thought of as providing a mechanism for resource management to the job within its allocation (–exact implied).
The exclusive allocation of CPUs applies to job steps by default. In order to share the resources use the –overlap option.
通过说明可知,默认情况下cpu是不会共享的。但是gpu即gres则会共享,因此如果想要不同job step之间不共享gpu,则需要指定--exclusive
-c, –cpus-per-task 每个task能够获取到的cpu数。对应于num_workers
-c, –cpus-per-task=<*ncpus*>
Request that ncpus be allocated per process**. This may be useful if the job is multithreaded and requires more than one CPU per task for optimal performance. The default is one CPU per process. If -c is specified without -n, as many tasks will be allocated per node as possible while satisfying the -c restriction. For instance on a cluster with 8 CPUs per node, a job request for 4 nodes and 3 CPUs per task may be allocated 3 or 6 CPUs per node (1 or 2 tasks per node) depending upon resource consumption by other jobs. Such a job may be unable to execute more than a total of 4 tasks.
WARNING: There are configurations and options interpreted differently by job and job step requests which can result in inconsistencies for this option. For example srun -c2 –threads-per-core=1 prog may allocate two cores for the job, but if each of those cores contains two threads, the job allocation will include four CPUs. The job step allocation will then launch two threads per CPU for a total of two tasks.
WARNING: When srun is executed from within salloc or sbatch, there are configurations and options which can result in inconsistent allocations when -c has a value greater than -c on salloc or sbatch.
This option applies to job allocations.
-l, –label 用于打印当前的task id
-l, –label
Prepend task number to lines of stdout/err. The –label option will prepend lines of output with the remote task id. This option applies to step allocations.
用于查看log的时候很有用,不过仅仅当srun时指定的ntasks > 1才会有效,否则都是多个0
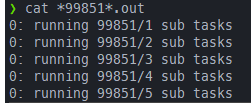
查看任务信息常用命令
scontrol show job_id 查看job详细信息
sacct 打印当前用户所有job的信息
sacct -j job_id 查看指定job的信息
scontrol show node 查看node详细信息
sbatch机制的一些理解
参考
Slurm can’t run more than one sbatch task
通过sbatch提交script后,sbatch会首先创建一个名为batch的job step,本质就是 运行所提交的shell script的操作。在script中的每一条srun命令,都会创建一个child process(对应一个job step),而这些srun命令 都只能在sbatch所申请并被salloc的资源中运行(共享(多条srun,可以实现并行?)或者独占(只有一条srun))
如下的命令,则会先申请 两个进程,然后分别在每个进程中运行一个文件
#!/bin/bash
#SBATCH --ntasks=2
srun --ntasks=1 something.py
srun --ntasks=1 somethingelse.py
salloc的用法
可以直接
salloc --gres=gpu:<number of gpus> -n<number of processes>来直接创建一个包含<number of gpus> 个gpu和<number of processes> 进程的bash要在这个bash中访问到GPU资源,仍然要用
srun命令来获取,如srun env | grep CUDA直接输入一条命令,默认则会同时放在<number of processes> 个进程中运行(即运行<number of processes> 次)
shell脚本中,直接用&接起来的算共享一个资源,不用&连接的srun命令则可以实现 资源的重复使用,不会被占用。因此若所有srun命令都直接用&接起来,很有可能是 因为资源不足而报错!
例子:
如下的script,首先
salloc --gres=gpu:3 -n2获得了三个GPU,两个CPU(线程)。(tfpt_py3) [weitaotang@bcm shell_script]$ scontrol show job 9524 JobId=9524 JobName=bash UserId=weitaotang(1025) GroupId=weitaotang(1025) MCS_label=N/A Priority=4294899444 Nice=0 Account=users QOS=normal JobState=RUNNING Reason=None Dependency=(null) Requeue=1 Restarts=0 BatchFlag=0 Reboot=0 ExitCode=0:0 RunTime=00:10:51 TimeLimit=UNLIMITED TimeMin=N/A SubmitTime=2019-10-10T13:40:14 EligibleTime=2019-10-10T13:40:14 AccrueTime=Unknown StartTime=2019-10-10T13:40:14 EndTime=Unknown Deadline=N/A PreemptTime=None SuspendTime=None SecsPreSuspend=0 LastSchedEval=2019-10-10T13:40:14 Partition=defq AllocNode:Sid=bcm:29374 ReqNodeList=(null) ExcNodeList=(null) NodeList=node02 BatchHost=node02 NumNodes=1 NumCPUs=2 NumTasks=2 CPUs/Task=1 ReqB:S:C:T=0:0:*:* TRES=cpu=2,node=1,billing=2,gres/gpu=3 Socks/Node=* NtasksPerN:B:S:C=0:0:*:* CoreSpec=* MinCPUsNode=1 MinMemoryNode=0 MinTmpDiskNode=0 Features=(null) DelayBoot=00:00:00 OverSubscribe=OK Contiguous=0 Licenses=(null) Network=(null) Command=(null) WorkDir=/home/weitaotang/noisy_label/GNN/mnist_gnn_pytorch/end_to_end/shell_script Power= TresPerNode=gpu:3直接运行脚本可以看到,第一条
srun ./show_device.sh命令因为没有指明进程数,所以默认用上全部进程(tasks),因此STEP_NUM_TASKS为2。运行了两次,两次的输出结果的RANK(SLURM_PROCID)都不一样。而之后的两条srun,则 共用一个资源空间,因此可用的GPU都不同,但是RANK都是0(在各自的进程中的相对PID都是0)。(tfpt_py3) [weitaotang@bcm shell_script]$ cat test_added_multiprocess.sh #!/bin/sh #srun bash -c 'echo JOB $SLURM_JOB_ID TASK ID $SLURM_TASK_PID CUDA_VISIBLE_DEVICES=$CUDA_VISIBLE_DEVICES' srun ./show_device.sh #srun --gres=gpu:2 -n1 --exclusive ./show_device.sh & #srun --gres=gpu:1 -n1 --exclusive ./show_device.sh & srun --gres=gpu:2 -n1 ./show_device.sh & srun --gres=gpu:1 -n1 ./show_device.sh & wait(tfpt_py3) [weitaotang@bcm shell_script]$ ./test_added_multiprocess.sh JOB 9524 STEP 12 Current Rank 0 TASK ID 55448 STEP_NUM_TASKS 2 CUDA_VISIBLE_DEVICES=5,6,7 JOB 9524 STEP 12 Current Rank 1 TASK ID 55449 STEP_NUM_TASKS 2 CUDA_VISIBLE_DEVICES=5,6,7 JOB 9524 STEP 13 Current Rank 0 TASK ID 55478 STEP_NUM_TASKS 1 CUDA_VISIBLE_DEVICES=5,6 JOB 9524 STEP 14 Current Rank 0 TASK ID 55485 STEP_NUM_TASKS 1 CUDA_VISIBLE_DEVICES=7
关于每个用户可用GPU数的理解:
- 6个可用指的是 所有job加起来总共6个可用
- 即便是在不同terminal中用
salloc尝试分配,一旦各个terminal的总数加起来超过6,也不行 - 因此:最佳的做法是直接在一个sbatch中求得6个或者在salloc中直接求得6个,然后用job steps的办法实现并行,或者用pytorch等自己的方法实现并行
官方的一些例子
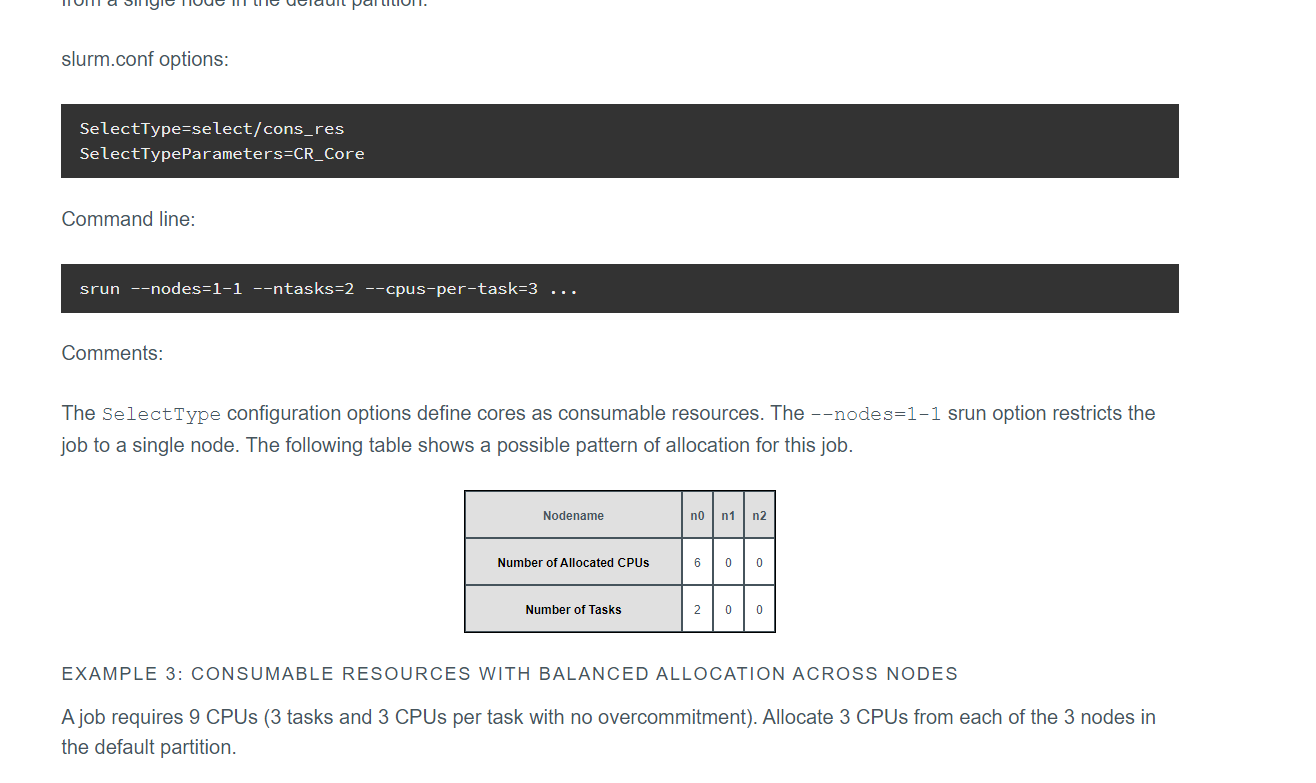
CPU Management User and Administrator Guide,主要是CPU资源的分配,不过大差不差,gpu也是也是的思路。可以看看。
比如下面这个,就比较有代表性
多进程的一些测试:
- 如果想不先 显式地salloc资源,再运行script,而是直接运行shell script的话:
- 使用nccl 后端:
- 使用file share:不同node也可
- 使用tcp:必须得在同一个node上面
- 使用gloo后端:
- 使用file share:不同node都可
- 使用tcp:必须得在同一个node上面
- 使用nccl 后端:
- 必须得在每一条
srun中 **显式地用&**,保证其在后台运行 - 使用tcp初始化的话,必须使用 127.0.0.1(即本地IP),因为实验室的计算节点不支持ssh直接IP访问,端口可以任意
所有线程都写在一个shell script里,不加–exclusive
#!/bin/sh
#SBATCH --gres=gpu:3
#SBATCH -n 2

work_folder="$(dirname "$PWD")/distributed_training"
echo "$work_folder"
srun --gres=gpu:2 -n1 python "$(dirname "$PWD")/distributed_training/toy_case.py" --init-method tcp://127.0.0.1:23456 --rank 0 --world-size 2
srun --gres=gpu:2 -n1 python "$(dirname "$PWD")/distributed_training/toy_case.py" --init-method tcp://127.0.0.1:23456 --rank 1 --world-size 2实验表明会stuck在第一个里面(因为默认的dist.init_process_group的timeout参数,对于gloo backend来说是30分钟,因此会一直等所有进程都初始化完成)
手动结束第一个进程scancel 9656 ,会继续执行第二行srun,但结果一样是stuck在那里。
因此这样是 无法完成多进程初始化的
所有线程都写在一个shell script里,加–exclusive
#!/bin/sh
#SBATCH --gres=gpu:3
#SBATCH -n 2

work_folder="$(dirname "$PWD")/distributed_training"
echo "$work_folder"
srun --gres=gpu:2 -n1 --exclusive python "$(dirname "$PWD")/distributed_training/toy_case.py" --init-method tcp://127.0.0.1:23456 --rank 0 --world-size 2
srun --gres=gpu:2 -n1 --exclusive python "$(dirname "$PWD")/distributed_training/toy_case.py" --init-method tcp://127.0.0.1:23456 --rank 1 --world-size 2
超过了系统限制则不行
(tfpt_py3) [weitaotang@bcm shell_script]$ ./run_toy_case.sh
/home/weitaotang/noisy_label/GNN/mnist_gnn_pytorch/end_to_end/distributed_training
srun: job 9658 queued and waiting for resources
srun: Job has been cancelled
srun: error: Unable to allocate resources: Job/step already completing or completed
srun: job 9659 queued and waiting for resources
srun: Job has been cancelled
srun: Force Terminated job 9659
srun: error: Unable to allocate resources: Job/step already completing or completed
对原来的shell script进行修改:调小gpu个数
#!/bin/sh
#SBATCH --gres=gpu:3
#SBATCH -n 2

work_folder="$(dirname "$PWD")/distributed_training"
echo "$work_folder"
srun --gres=gpu:1 -n1 --exclusive python "$(dirname "$PWD")/distributed_training/toy_case.py" --init-method tcp://127.0.0.1:23456 --rank 0 --world-size 2
srun --gres=gpu:1 -n1 --exclusive python "$(dirname "$PWD")/distributed_training/toy_case.py" --init-method tcp://127.0.0.1:23456 --rank 1 --world-size 2
依旧不行
结果:无法实现多进程
正确做法1:分terminal进行,用命令行参数对shell文件输入进行更改
需要注意:若使用
tcp的初始化方式,则 一定要在127.0.0.1上进行,端口可以任意,协议可以用ncclsrun中的进程数-n --ntasks必须为1,否则子进程必报错(即 最后还只是留下一个进程),因为除了一开始的job step那个进程外,其余进程初始化时都会发现端口被占用srun中当GPU数多于1时,也很容易不行(因为此时很容易把两个任务分到不同的node上,则对应的localhost都不同了),但若在srun中强制指定在同一台机子上,则可以,因为都是在同一个node上运行的参考的shell script 与 toy_case.py中的端口设定如下(强制都在node3上,端口随便定)
#!/bin/sh #SBATCH --gres=gpu:3 #SBATCH -n 2 work_folder="$(dirname "$PWD")/distributed_training" echo "$work_folder" srun --gres=gpu:2 --pty -w node03 python "$(dirname "$PWD")/distributed_training/toy_case.py" --backend nccl --init_port 37082 --rank $1 --world-size 2 waitargs.init_method = 'tcp://' + '127.0.0.1' + ':' + args.init_port
正确做法2: 用salloc分配资源,然后shell script中实现并行
- 先通过
salloc分配资源,然后可以通过设定--exclusive来保证各个线程之间互不冲突 - 此时若直接用
import ipdb \ ipdb.set_trace()来debug是肯定不行的,必须得用python -m ipdb来debug。但是需要注意的是,虽然两个srun指令都有ipdb,但是在terminal中显示得就只有一个的感觉,因此若要debug,还是通过在不同terminal开不同的process来实现比较好
否则容易报错:
(tfpt_py3) [weitaotang@bcm shell_script]$ ./run_toy_case.sh
/home/weitaotang/noisy_label/GNN/mnist_gnn_pytorch/end_to_end/distributed_training
> /home/weitaotang/noisy_label/GNN/mnist_gnn_pytorch/end_to_end/distributed_training/toy_case.py(32)main()
     31     ipdb.set_trace()
---> 32     parser = argparse.ArgumentParser()
     33     parser.add_argument('--backend', type=str, default='gloo', help='Name of the backend to use.')

> /home/weitaotang/noisy_label/GNN/mnist_gnn_pytorch/end_to_end/distributed_training/toy_case.py(32)main()
     31     ipdb.set_trace()
---> 32     parser = argparse.ArgumentParser()
     33     parser.add_argument('--backend', type=str, default='gloo', help='Name of the backend to use.')

ipdb>
Exiting Debugger.
srun: error: node01: task 0: Exited with exit code 1
& 的使用:能够保证那一条command在 后台中 运行,从而能够实现 多线程。如果在shell脚本中不加 & ,则容易导致 一直stuck在上一条命令中,没办法开启多进程。因此切记一定要加&!!!
不建议加
--pty容易导致后面出问题各条srun之间的
CUDA_VISIBLE_DEVICES都是exclusive的(即一定 各不相同),但是每一条srun中的torch.cuda.current_device()默认还是 从0开始更新:
根据Unable to share GPU,SLURM会给每个job steps都分配 独立的GPU,因此不同job steps之间的
CUDA_VISIBLE_DEVICES都参数都是不同的(哪怕 不加exclusive),所以这么做的话,会导致各个GPU之间无法通讯。**(已经不对了!!)**Slurm can assign jobs to particular GPUs on a node. Multiple jobs per node. Slurm will not assign multiple jobs to the same GPU hardware. This is documented under generic resource scheduling (GRES). https://slurm.schedmd.com/gres.html
因此,如果要实现并行计算,只能srun一条命令,然后在这条命令中生成多个进程来实现(通过spawn或者launch)(已经不对了!!)
是可以通过这个这个方法实现,但是要注意以下几个点:
申请资源的时候
--gres=gpu:-n一定要相等,且恰好等于希望并行的数目(即一个GPU对应一个进程各条子srun命令运行的时候,**一定要显式地加入
-n1**参数,来保证他们不会互不共享进程(否则容易出现Address Used)的error参考例子如下(文件开头显式地确定了所需的gpu数):
#!/bin/bash
#SBATCH --gres=gpu:3
#SBATCH -n 3
echo "Number of gpus is $1"

for (( r = 0; r <= "$1"; r++ )); do
  srun --gres=gpu:1 -n1 --pty python "$(dirname "$PWD")/cifar10_mixmatch_only_dist.py" \
    --rank "$r" --world-size "$1" --init-method tcp://127.0.0.1:29874 &
done
对应的salloc命令如下:
salloc --gres=gpu:3 -n3
正确做法3:分terminal执行,init_method 用file://
- 注意
file://后面还要接多一个\,如file:///home/weitaotang/sharefiles - sharefiles必须不存在!!(最好手动删除,虽然pytorch也能自动删),但是对应的directory必须存在!!(即pytorch不会帮你创建directory)
- 建议不加
--pty,否则容易报错 - 不建议加
--exclusive,很容易被queued
正确做法4: 使用sbatch,提交shell script
初始化参数可以在shell script开头通过添加
#SBATCH --options来实现。但是像普通shell文件那样没办法直接通过命令参数输入init_method为tcp或者file share都行
--exclusive可加可不加例子:
#!/bin/sh
#SBATCH --gres=gpu:4
#SBATCH -n 2
#SBATCH -o toy_case_sbatch.txt

work_folder="$(dirname "$PWD")/distributed_training"
echo "$work_folder"
#srun --gres=gpu:2  -n1 -v --exclusive python "$(dirname "$PWD")/distributed_training/toy_case.py" --init-method file:///home/weitaotang/sharefiles --backend gloo --init_port 37082  --rank 0 --world-size 2 &
#srun --gres=gpu:2  -n1 -v --exclusive python "$(dirname "$PWD")/distributed_training/toy_case.py" --init-method file:///home/weitaotang/sharefiles --backend gloo --init_port 37082  --rank 1 --world-size 2 &
srun --gres=gpu:2  -n1  python "$(dirname "$PWD")/distributed_training/toy_case.py" --init-method tcp://127.0.0.1:37082 --backend nccl --rank 0 --world-size 2 &
srun --gres=gpu:2  -n1  python "$(dirname "$PWD")/distributed_training/toy_case.py" --init-method tcp://127.0.0.1:37082 --backend nccl --rank 1 --world-size 2 &
wait
srun debug
法1:通过ipdb
可以通过
-m ipdb的方式进行(首推这个),也可以通过在需要停下来的地方加ipdb.set_trace()加上
-c continue之后,则能够保证其 一直运行到有错的地方位置,然后在errors的位置停下来例子:
srun --gres=gpu:1 python -m ipdb xxx.py args
法2:通过Pycharm的Remote Dedugging(强推!!)
- 参考:
- 官方教程:Remote debugging with the Python remote debug server configuration
- 这个帖子说的非常清楚,详参这个:How do I start up remote debugging with PyCharm?
- 还可以参考这个关于docker的:From inside of a Docker container, how do I connect to the localhost of the machine?
- 详细中文解释:利用 PyCharm 进行 Python 远程调试
server和client的定义:这里实际上是通过 本地机扮演server,remote的server扮演client的角度,来实现remote debugging的。
PyCharm (or your ide of choice) acts as the “server” and your application is the “client”; so you start the server first - tell the IDE to ‘debug’ - then run the client - which is some code with the
settracestatement in it. When your python code hits thesettraceit connects to the server - pycharm - and starts feeding it the debug data.具体的原理就是通过ssh,当在client(服务器上)运行的code到达了
settrace的地方时,则会通过制定好的地址和端口进行通讯,把服务器的数据回传到本地的IDE中(即server端)set_trace的具体参数详解,
pydevd_pycharm.settrace(<host name>, port=<port number>):host name指的是运行在本地的host,具体而言指的是本机IDE在局域网中的IP(可通过ipconfig)查看
port name默认是0,表示随机生成一个端口,也可以指定为IDE本机上空闲的端口suspend默认为True,即会在settrace的地方停下,如果设为False,则会在断点或者exception处停下(如果在View Breakpoint中设定了any exception)
具体使用方法:
到Configuration—-Edit Configuration—-Python Remote Debug中新增一个Configuration
设定好本地ide在局域网中的IP和port之后,根据图中的提示在remote server上安装对应的版本的pydev-pycharm(注意!一定要安装对应版本的pydev-pycharm,命令中
~=部分后的数字即版本号)设定好映射的路径,注意只用
base_name(即待运行文件所在folder的映射)即可。在待运行的文件开头插入对应的代码片段
本地IDE开启调试模式,remote server上用
srun等工具运行命令,则可进入调试模式。
开启GPU调试
需要使用内网穿透(推荐Frp)
最直接的,通过natfrp来穿透,转发流量。需要注意,实验室的主机必须开启UDP转发,才可以实现服务器直接连接到natfrp的服务
实验室的主机通过socat同时开启tcp和UDP转发
实验室的主机无需开启frp client,直接在需要调试的机子开启frp client,然后pycharm的debug监那个端口就可以了。参考配置如下:
1, natfrp上开启tcp转发,本地地址为127.0.0.1,本地端口为13531,远程端口(natfrp服务器的)端口为12382
实验室的主机socat转发,监听39581,然后转发到natfrp的服务器(如现在经常用宿迁服务器
s25.natfrp.org),端口为12382本地的debug的电脑上开启frp client即可,pycharm debugger的address用127.0.0.1,port用13531
python文件中设置连接到实验室的主机(10.8.15.170, port=39581)
先开启本地的server服务监听端口,然后通过Mobaxterm把脚本跑起来就可以了
20210129 update(最新的简单方法!!无需在第三台主机上开启frp)
参考:
最简单,通过一个有公网IP的VPS转发流量即可。即:
- 直接在一个公网的VPS上开启frp,本地主机开启frpc连接公网的VPS,本地主机的
frpc中设置为ssh - 然后在代码中的host设置为公网VPS的IP
参考设置:
- 本地主机所用的
frpc.ini:
[common]
server_addr = xx.xx.xx.xx
server_port = 7000

[ssh]
type = tcp
local_ip = 127.0.0.1
local_port = 21342
remote_port = 21342
- 公网vps所用的
frps.ini
[common]
bind_port = 7000- 代码中的debug设置:
pydevd_pycharm.settrace('194.87.232.23', port=21342, stdoutToServer=True, stderrToServer=True, suspend=False)后期还可以考虑使用stcp,参考 安全地暴露内网服务
20210213 frp使用stcp
服务端(即公网的VPS)的设置和上面的直接ssh的类似:
[common]
bind_port = 36130此时本地机和服务器上都是作为client,其中本地机可以认为是被暴露内网的机子,而服务器则作为访问本地机服务的外部机器(即visitor)。因此两个客户端的设置分别如下:
服务器上:
[common]
server_addr = xxx.xx.xx.xx
server_port = 36130

[secret_ssh_visitor]
# frpc role visitor -> frps -> frpc role server
role = visitor
type = stcp
# the server name you want to visitor
server_name = secret_ssh
# 即key,可以随机生成
sk = yX7dp@ApWU8fA4iR
# connect this address to visitor stcp server
# 即在服务器上,在代码中访问对应的端口即可创建到本地机的连接
bind_addr = 127.0.0.1
bind_port = 21342
本地机:
[common]
server_addr = 194.87.232.23
server_port = 36130

[secret_ssh]
# If the type is secret tcp, remote_port is useless
# Who want to connect local port should deploy another frpc with stcp proxy and role is visitor
type = stcp
# sk used for authentication for visitors
sk = yX7dp@ApWU8fA4iR
local_ip = 127.0.0.1
local_port = 21342
在代码中添加如下的即可:
pydevd_pycharm.settrace('127.0.0.1', port=21342, stdoutToServer=True, stderrToServer=True, suspend=False)但是由于本质上被暴露的机子是本地机,服务器在直接的ssh连接中直接访问公网的vps,不会有任何信息的泄露,因此推荐直接用 [20210129 update(最新的简单方法!!无需在第三台主机上开启frp)](#20210129 update(最新的简单方法!!无需在第三台主机上开启frp))中的方法
和tmux或者screen的结合
对于tmux来说,是没办法直接获取到source的allocation的:
# 开启tmux
❯ salloc -w node05 -n 2 tmux

# 进入tmux之后,可以看到ntask没有受限
❯ srun -l --ntasks 8 -c 1 hostname
srun: job 99824 queued and waiting for resources
srun: job 99824 has been allocated resources
3: node05
1: node05
4: node05
6: node05
2: node05
7: node05
0: node05
5: node05
但是如果直接用zsh就可以,没有问题,被限制了
❯ salloc -w node05 -n 2 zsh
salloc: Pending job allocation 99825
salloc: job 99825 queued and waiting for resources
salloc: job 99825 has been allocated resources
salloc: Granted job allocation 99825
# 上述的`ntasks`限制了
❯ srun -l --ntasks 8 -c 1 hostname
srun: error: Unable to create step for job 99825: More processors requested than permitted
折中办法:salloc后,先srun一个shell到计算节点上,再在上面开启tmux
这样之后就能够顺利在node05上用上tmux了,而且也可以通过srun来控制node或者cpu的数量
❯ srun -l --ntasks 8 -c 1 hostname
❯ srun -n1 --pty zsh
❯ echo $SLURM_NTASKS
1

可以看到此时这个zsh只有一个tasks quota了
直接输入tmux,能够在node05上成功开启,并且ntasks数量受上一层的srun控制
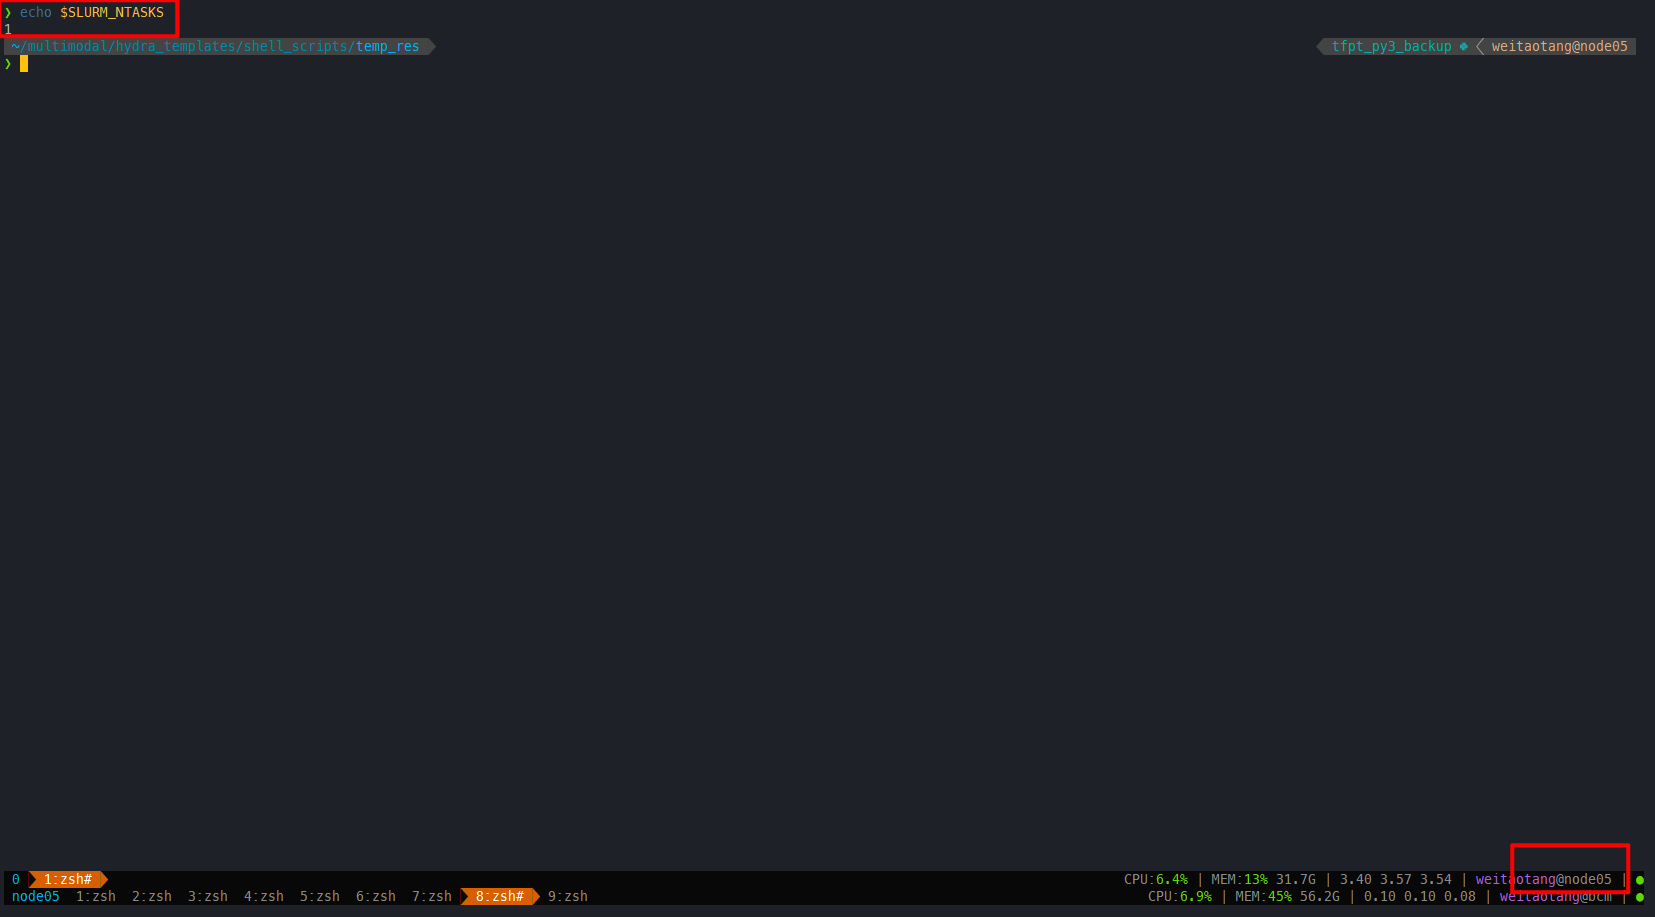
整理下来即:
# 指定好节点,以及对应所需的tasks数
salloc --gres=gpu:1 -w nodename -n 6 zsh
# 通过srun获取gpu资源,运行对应的程序
srun --gres=gpu:1 -t 4320 --pty zsh

## Optional 开启tmux,不过不推荐直接在zsh中开启tmux
tmux推荐可以用screen,因为能够共享salloc的信息
# 指定好节点,以及对应所需的tasks数
salloc --gres=gpu:1 -w nodename -n 6 zsh
screen
# 通过srun获取gpu资源,运行对应的程序
srun --gres=gpu:1 -t 4320 --pty zsh
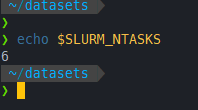
sbatch job array的一些尝试
其实用法很简单,就是在提交sbatch时候,加多一个--array参数即可。最后对应的job_id就会有一个后缀,比如下面的就是--array=1-4的结果

下面的实验都是基本基于下面这个脚本
#!/bin/bash
#SBATCH --ntasks=4
## more options

srun -l --ntasks 1 -c 1 bash -c "echo running $SLURM_ARRAY_JOB_ID\/$SLURM_ARRAY_TASK_ID sub tasks;sleep 10"
先说总结:
- 本质上job array等价于自动提交多个
sbatch,并添加了一些环境变量,所以sbatch脚本中的shebang的限制只限制array中的每个sub task
shebang只限制每个sub task,而salloc分配的资源限制总的task数
一开始salloc -n 8 --pty zsh开启一个新的shell,可以看到总的tasks数即3
❯ echo $SLURM_NTASKS
8
默认用上面#SBATCH --ntasks=4,然后使用sbatch --array=1-12 interpret_task.sh提交任务,可以看到#SBATCH --ntasks=4的限制对整个job array是无效的,但是总的ntasks=8还是起效的,99875_[8-12]作为一个job step占用一个task

修改之后的脚本,此时shebang就起作用了,因此此时等价于每条srun(每个所提交的脚本文件)的tasks数都被限制为3
#!/bin/bash
#SBATCH --ntasks=3
## more options
#srun --ntasks 8 -c 2 bash -c "echo hello; sleep 10"
#srun -l --ntasks 4 -c 2 hostname

srun -l --ntasks 2 -c 2 bash -c "echo running $SLURM_ARRAY_JOB_ID\/$SLURM_ARRAY_TASK_ID sub tasks;sleep 10"
运行提示资源不足,直接被杀
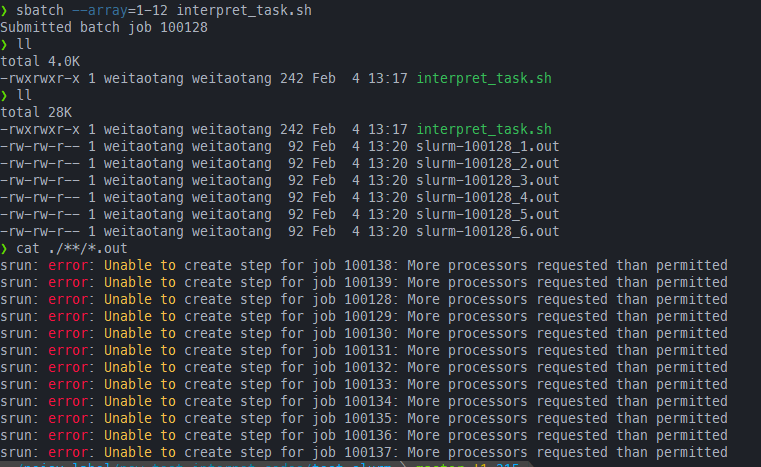
srun提交的ntasks=2 cpu-per-task=2
sbatch --array=1-12 interpret_task.sh
由于一开始salloc获得的ntasks=8,而默认情况下cpu-per-task=1,因此等价于总共获取了8个cpu。
而每一条srun都需要4个cpu,因此执行的时候等价于每次只能执行两条srun指令
#!/bin/bash
#SBATCH --ntasks=4
## more options

srun -l --ntasks 2 -c 2 bash -c "echo running $SLURM_ARRAY_JOB_ID\/$SLURM_ARRAY_TASK_ID sub tasks;sleep 10"
提交gpu任务
注意由于job array是基于sbatch的,因此需要gpu任务的需要在shebang中指定,而不应该在srun中指定
即下面的才是正确的
#!/bin/bash
#SBATCH --ntasks=3
#SBATCH --gres=gpu:1 # 正确做法
## more options
#srun --ntasks 8 -c 2 bash -c "echo hello; sleep 10"
#srun -l --ntasks 4 -c 2 hostname

#错误写法
# srun -l --gres=gpu:1 --ntasks 1 -c 1 bash -c "echo running $SLURM_ARRAY_JOB_ID\/$SLURM_ARRAY_TASK_ID sub tasks;sleep 10"
srun -l --ntasks 1 -c 1 bash -c "echo running $SLURM_ARRAY_JOB_ID\/$SLURM_ARRAY_TASK_ID sub tasks;sleep 10"
但是由于job array基于sbatch,所以执行下面的两条指令不能成功:
sbatch --array=1-12 interpret_task_gpu.sh
# or 手动限制每次执行的任务数为1
sbatch --array=1-12%1 interpret_task_gpu.sh
必须得关了一开始salloc,退出这个job,直接在管理节点上提交job array才行

针对submitit的一些理解
这里主要指的是hydra的。hydra的submitit插件在multirun的情况下,默认就是基于sbatch的job array,所以同样的如果在salloc之后,然后在config中指定了gres=gpu:1,一样会因为资源被限制而无法执行

对应的config.yaml和自动生成的submission.sh:
defaults:
  - hydra/launcher: submitit_slurm

task: 1
hydra:
  launcher:
    cpus_per_task: 1
    tasks_per_node: 1
    partition: defq
    array_parallelism: 1
    additional_parameters:
      nodelist: "node04"
      time: 1440
      gres: gpu:1
#!/bin/bash
# Parameters
#SBATCH --array=0-2%1
#SBATCH --cpus-per-task=1
#SBATCH --error=/home/weitaotang/package/hydra/plugins/hydra_submitit_launcher/example/multirun/2021-02-04/14-09-11/.submitit/%A_%a/%A_%a_0_log.err
#SBATCH --gres=gpu:1
#SBATCH --job-name=my_app
#SBATCH --mem=4GB
#SBATCH --nodelist=node04
#SBATCH --nodes=1
#SBATCH --ntasks-per-node=1
#SBATCH --open-mode=append
#SBATCH --output=/home/weitaotang/package/hydra/plugins/hydra_submitit_launcher/example/multirun/2021-02-04/14-09-11/.submitit/%A_%a/%A_%a_0_log.out
#SBATCH --partition=defq
#SBATCH --signal=USR1@120
#SBATCH --time=1440
#SBATCH --wckey=submitit
# command
export SUBMITIT_EXECUTOR=slurm
srun --output /home/weitaotang/package/hydra/plugins/hydra_submitit_launcher/example/multirun/2021-02-04/14-09-11/.submitit/%A_%a/%A_%a_%t_log.out --error /home/weitaotang/package/hydra/plugins/hydra_submitit_launcher/example/multirun/2021-02-04/14-09-11/.submitit/%A_%a/%A_%a_%t_log.err --unbuffered /home/weitaotang/.conda/envs/multimodal/bin/python -u -m submitit.core._submit /home/weitaotang/package/hydra/plugins/hydra_submitit_launcher/example/multirun/2021-02-04/14-09-11/.submitit/%j
同样是需要推出salloc重新提交。可以看到在设置了array_parallelism: 1后,这时候就能够成功执行了


submitit重跑job array中失败的任务,并保存到原目录
关键点:
- 删除上一次失败的任务,或者把他们改名(比如在开头添加
failed) - 修改一开始的参数
具体步骤如下:
首先找到submiti自动生成的脚本(通常在对应sweep folder的.submitit下),比如下面这个
#!/bin/bash

# Parameters
#SBATCH --array=0-7%8
#SBATCH --cpus-per-task=4
#SBATCH --error=/home/weitaotang/multimodal/pytorch_hydra_results_temp/multirun/2021-03-10/21-21-13-enterface_reuters_ieg_best_original_all_rerun_lr0.001/.submitit/%A_%a/%A_%a_0_log.err
#SBATCH --exclude=node01,node02,node03
#SBATCH --gres=gpu:1
#SBATCH --job-name=enterface_ieg_train
#SBATCH --mem=12GB
#SBATCH --nodes=1
#SBATCH --ntasks-per-node=1
#SBATCH --open-mode=append
#SBATCH --output=/home/weitaotang/multimodal/pytorch_hydra_results_temp/multirun/2021-03-10/21-21-13-enterface_reuters_ieg_best_original_all_rerun_lr0.001/.submitit/%A_%a/%A_%a_0_log.out
#SBATCH --partition=defq
#SBATCH --qos=high
#SBATCH --signal=USR1@120
#SBATCH --time=4320
#SBATCH --wckey=submitit

# command
export SUBMITIT_EXECUTOR=slurm
srun --output /home/weitaotang/multimodal/pytorch_hydra_results_temp/multirun/2021-03-10/21-21-13-enterface_reuters_ieg_best_original_all_rerun_lr0.001/.submitit/%A_%a/%A_%a_%t_log.out --error /home/weitaotang/multimodal/pytorch_hydra_results_temp/multirun/2021-03-10/21-21-13-enterface_reuters_ieg_best_original_all_rerun_lr0.001/.submitit/%A_%a/%A_%a_%t_log.err --unbuffered /home/weitaotang/.conda/envs/multimodal_new/bin/python -u -m submitit.core._submit /home/weitaotang/multimodal/pytorch_hydra_results_temp/multirun/2021-03-10/21-21-13-enterface_reuters_ieg_best_original_all_rerun_lr0.001/.submitit/%j
然后修改开头的job array,比如失败的任务是0,5,则可以直接修改第一行为#SBATCH --array=0,5
同时还可以加入requeue让其自动失败重跑。最后的脚本如下
#!/bin/bash

# Parameters
#SBATCH --array=0,5
#SBATCH --requeue
#SBATCH --cpus-per-task=4
#SBATCH --error=/home/weitaotang/multimodal/pytorch_hydra_results_temp/multirun/2021-03-10/21-21-13-enterface_reuters_ieg_best_original_all_rerun_lr0.001/.submitit/%A_%a/%A_%a_0_log.err
#SBATCH --exclude=node01,node02,node03
#SBATCH --gres=gpu:1
#SBATCH --job-name=enterface_ieg_train
#SBATCH --mem=12GB
#SBATCH --nodes=1
#SBATCH --ntasks-per-node=1
#SBATCH --open-mode=append
#SBATCH --output=/home/weitaotang/multimodal/pytorch_hydra_results_temp/multirun/2021-03-10/21-21-13-enterface_reuters_ieg_best_original_all_rerun_lr0.001/.submitit/%A_%a/%A_%a_0_log.out
#SBATCH --partition=defq
#SBATCH --qos=high
#SBATCH --signal=USR1@120
#SBATCH --time=4320
#SBATCH --wckey=submitit

# command
export SUBMITIT_EXECUTOR=slurm
srun --output /home/weitaotang/multimodal/pytorch_hydra_results_temp/multirun/2021-03-10/21-21-13-enterface_reuters_ieg_best_original_all_rerun_lr0.001/.submitit/%A_%a/%A_%a_%t_log.out --error /home/weitaotang/multimodal/pytorch_hydra_results_temp/multirun/2021-03-10/21-21-13-enterface_reuters_ieg_best_original_all_rerun_lr0.001/.submitit/%A_%a/%A_%a_%t_log.err --unbuffered /home/weitaotang/.conda/envs/multimodal_new/bin/python -u -m submitit.core._submit /home/weitaotang/multimodal/pytorch_hydra_results_temp/multirun/2021-03-10/21-21-13-enterface_reuters_ieg_best_original_all_rerun_lr0.001/.submitit/%j