python-basic
从两个list(key list,value list)构建dict
直接用zip
dictionay = dict(zip(key, value))嵌套zip
就是先把一个zip的item,和另一个iterable的item拼在一起,和普通zip没区别
for node, value in zip(split_sorted_indices.tolist(),
                       zip(split_sorted_node_features, split_sorted_eval_label.tolist(), split_sorted_loss.tolist(),
                           split_original_label.tolist())):
    attr_dict = dict(zip(['node_features', 'eval_label', 'loss', 'original_label'], value))
    g.add_node(node, **attr_dict)
路径问题. / ..

- .就是本层(本package folder内)
- .. 就是parent层
logging twice
log messages appearing twice with Python Logging
while logger.handlers:
     logger.handlers.pop()
list extend 与 append的联系与区别
- 二者都可以接受一个整个list作为参数。
- 不同的是,extend是把那个list中每一个element逐个添加到原来的list中, 而append则是把整个list作为一个新的element插入到原来的list当中。
nested list flatten的方法
参考:
how-to-make-a-flat-list-out-of-list-of-lists
用一行式:
flat_list = [item for sublist in l for item in sublist]
PIL 与 numpy互转
转成numpy:
numpy.array(img)转成PIL image
PIL.Image.fromarray(array)- 注意这个函数一次只能接受一个image(即array的shape应该为(C, H, W)),若要同时处理多个,应该用for 循环一行式
把kwargs 作为class attributes:
self.__dict__.updatehow-can-you-set-class-attributes-from-variable-arguments-kwargs-in-python
把args kwargs不断传递:* 与 **
how-to-pass-a-args-kwargs-type-of-attribute-to-a-function-within-class
dict合并的方法
参考:
- dict(ditc.items() + dict.items())
推荐用update的方法(dict.update(dict2))
但是要注意的是,不能直接把updated list赋值给一个新的变量,新的变量会是NoneType,即如下的代码是无效的:
new_dict = old_dict.update(dict2)正确的应该如下:
new_dict=old_dict
new_dict.update(dict2)
iter与next的使用
iter()首先作用于iterable(可迭代对象)上面(比如list),得到一个iteratornext()再作用在由iter()生成的iterator,不断输出其中的值,直至结尾 / 或者直接调用iterator.next()获得下一个元素若要重新开始,则再用一次
iter()得到新的iterator,再用nextnext可以添加当下一个元素为空时的返回值(即default),这个非常有用
next(iterator[, default])每call一次next,只输出一个值,因此需要不断地调用next,才能不断地输出。
例子:
ld3 = DataLoader(torch.tensor([1,2,3,4]), batch_size=2)
iterator = iter(ld3)
while True:
    try:
        print(next(iterator))
    except StopIteration:
        break

>>>tensor([1, 2])
>>>tensor([3, 4])
上述例子把整个list print完
通过for + StopIteration控制读取次数:
下面的例子通过for,输出5个batch
ld3 = DataLoader(torch.tensor([1,2,3,4]), batch_size=2)
iterator = iter(ld3)
for i in range(5):
    try:
        print(next(iterator))
    except StopIteration:
        iterator = iter(ld3)
        print(next(iterator))
tensor([1, 2])
tensor([3, 4])
tensor([1, 2])
tensor([3, 4])
tensor([1, 2])通过for + next 默认值控制循环次数:
注意在for循环中需要不断地赋值(调用next)
ld3 = DataLoader(torch.tensor([1,2,3,4]), batch_size=2)
iterator = iter(ld3)
next_item = next(iterator, False)
for i in range(5):
    if next_item is not False:
        print(next_item)
        next_item = next(iterator, False)
    else:
        iterator = iter(ld3)
        next_item = next(iterator, False)
        print(next_item)
tensor([1, 2])
tensor([3, 4])
tensor([1, 2])
tensor([1, 2])
tensor([3, 4])通过next的default value控制多个iterator:
ld4循环一次,ld5循环两次
ld4 = DataLoader(torch.arange(12), batch_size=3)
ld5 = DataLoader(torch.arange(12), batch_size=6)
iterator4 = iter(ld4)
iterator5 = iter(ld5)
next_ld4 = next(iterator4, False)
next_ld5 = next(iterator5, False)

while next_ld4 is not False:
    print(next_ld4, next_ld5)
    next_ld4 = next(iterator4, False)
    next_ld5 = next(iterator5, False)
    if next_ld5 is False:
        iterator5 = iter(ld5)
        next_ld5 = next(iterator5, False)
tensor([0, 1, 2]) tensor([0, 1, 2, 3, 4, 5])
tensor([3, 4, 5]) tensor([ 6, 7, 8, 9, 10, 11])
tensor([6, 7, 8]) tensor([0, 1, 2, 3, 4, 5])
tensor([ 9, 10, 11]) tensor([ 6, 7, 8, 9, 10, 11])也可通过for + while loop控制多个循环:
更加直观(不用控制最外层的循环),但要注意在在except中要初始化iterator
ld4 = DataLoader(torch.arange(12), batch_size=3)
ld5 = DataLoader(torch.arange(12), batch_size=6)
iterator4 = iter(ld4)
iterator5 = iter(ld5)

for next_ld4 in iterator4:
    try:
        next_ld5 = next(iterator5)
    except StopIteration:
        iterator5 = iter(ld5)
        next_ld5 = next(iterator5)
    print(next_ld4, next_ld5)
tensor([0, 1, 2]) tensor([0, 1, 2, 3, 4, 5])
tensor([3, 4, 5]) tensor([ 6, 7, 8, 9, 10, 11])
tensor([6, 7, 8]) tensor([0, 1, 2, 3, 4, 5])
tensor([ 9, 10, 11]) tensor([ 6, 7, 8, 9, 10, 11])可以用容器(container)来装iterator,比如list
如果想一次过看完整个iterator所包含的元素,可以用list tuple的容器装起来,就可以一次过迭代完成了
__iter__, iter(), iterable, iterator 的联系与区别:
python的迭代器为什么一定要实现__iter__方法? 说的比较清楚,参考前面两个答案,第一个答案还解释了python中for循环所支持的两种机制
由第二个答案,可以有四个概念(两个类,两个对象,类主要是定义形式,对象就是具体实践这些规则的执行者):
- 可迭代类 class collections.abc.Iterable:包含
__iter__或者__getitem__的类 - 迭代器类 class collections.abc.Iterator:需要同时包含
__iter__和__next__ - 可迭代对象(iterable):实现了
__iter__或者__getitem__方法的对象,如list, tuple, str等等。(对应1) - 迭代器对象(iterator):实现了
__next__的类(对应2)
综上,
- 从字面意思看,iterator主要是为了取出元素,而iterable则表示支持迭代这一种属性
- 但因为iterator 实现了
__iter__,所以iterator一定是 iterable (因为实现了__iter__方法),因此iterable是比iterator更大的而概念 - 至于为什么要实现
__iter__方法(显而易见,iterator为了取出元素只需要__next__方法就好了): 则是为了接口的统一,让iterator自己也能像iterable那样被for in的语句处理。否则对于一个返回iterator的方法来说就会变得很不方便,需要先返回一个iterable的对象,然后再让iterable返回一个iterator
而iter()的实现,则是为了取出那个对象的对应的迭代器iterator,有了iterator之后就可以用next遍历元素了了
获取新list
直接extend或者append是不行的
l1 = [1,2,3]
l2 = [4]
l3 = l1.append(l2)上述式子l3为None,因为extend或者append都是inplace操作
具体方法参考:
浅拷贝(list内的元素不复制)
new_list = old_list.copy()new_list = old_list[:]new_list = list(old_list)import copy
new_list = copy.copy(old_list)# Better this way when dealing with two lists
new_list = [*old_list_1, *old_list_2]
# or
new_list = old_list_1[:] + old_list_2[:]深拷贝(list内的元素也复制一次)
import copy
new_list = copy.deepcopy(old_list)
sorted函数用法
对多个指标排序 Multiple keys sorting
参考:
通过指定顺序即可(排在前面的先排序)
>>> student_objects = [
...     Student('john', 'A', 15),
...     Student('jane', 'B', 12),
...     Student('dave', 'B', 10),
... ]
>>> sorted(student_objects, key=lambda student: student.age)   # sort by age
[('dave', 'B', 10), ('jane', 'B', 12), ('john', 'A', 15)]>>> from operator import itemgetter, attrgetter
>>> sorted(student_objects, key=attrgetter('grade', 'age'))
[('john', 'A', 15), ('dave', 'B', 10), ('jane', 'B', 12)]直接用lambda函数
同样也能实现多个key效果,注意lambda函数内部应该返回一个tuple
files_name_sorted = sorted(files_name, key=lambda x:(x.split('_')[-2], x.split('_')[-1]))
files_name_sorted
输出
['group_by_future_user_search_behaviour_20200406_20200407.csv',
 'group_by_future_user_search_behaviour_20200406_20200408.csv',
 'group_by_future_user_search_behaviour_20200406_20200409.csv',
 'group_by_future_user_search_behaviour_20200406_20200410.csv',
 'group_by_future_user_search_behaviour_20200406_20200411.csv',
 'group_by_future_user_search_behaviour_20200406_20200412.csv',
 'group_by_future_user_search_behaviour_20200406_20200413.csv',
 'group_by_future_user_search_behaviour_20200407_20200408.csv',
 'group_by_future_user_search_behaviour_20200407_20200409.csv',
 'group_by_future_user_search_behaviour_20200407_20200410.csv',
 'group_by_future_user_search_behaviour_20200407_20200411.csv',
 'group_by_future_user_search_behaviour_20200407_20200412.csv',
 'group_by_future_user_search_behaviour_20200407_20200413.csv',
 'group_by_future_user_search_behaviour_20200407_20200414.csv',
 'group_by_future_user_search_behaviour_20200408_20200409.csv',
 'group_by_future_user_search_behaviour_20200408_20200410.csv',
 'group_by_future_user_search_behaviour_20200408_20200411.csv',
 'group_by_future_user_search_behaviour_20200408_20200412.csv',
 'group_by_future_user_search_behaviour_20200408_20200413.csv',
 'group_by_future_user_search_behaviour_20200408_20200414.csv',
 'group_by_future_user_search_behaviour_20200408_20200415.csv',
 'group_by_future_user_search_behaviour_20200409_20200410.csv',
 'group_by_future_user_search_behaviour_20200409_20200411.csv',
 'group_by_future_user_search_behaviour_20200409_20200412.csv',
 'group_by_future_user_search_behaviour_20200409_20200413.csv',
 'group_by_future_user_search_behaviour_20200409_20200414.csv',
 'group_by_future_user_search_behaviour_20200409_20200415.csv',
 'group_by_future_user_search_behaviour_20200409_20200416.csv',
 'group_by_future_user_search_behaviour_20200410_20200411.csv',
 'group_by_future_user_search_behaviour_20200410_20200412.csv',
 'group_by_future_user_search_behaviour_20200410_20200413.csv',
 'group_by_future_user_search_behaviour_20200410_20200414.csv',
 'group_by_future_user_search_behaviour_20200410_20200415.csv',
 'group_by_future_user_search_behaviour_20200410_20200416.csv',
 'group_by_future_user_search_behaviour_20200410_20200417.csv',
 'group_by_future_user_search_behaviour_20200411_20200412.csv',
 'group_by_future_user_search_behaviour_20200411_20200413.csv',
 'group_by_future_user_search_behaviour_20200411_20200414.csv',
 'group_by_future_user_search_behaviour_20200411_20200415.csv',
 'group_by_future_user_search_behaviour_20200411_20200416.csv',
 'group_by_future_user_search_behaviour_20200411_20200417.csv',
 'group_by_future_user_search_behaviour_20200411_20200418.csv',
 'group_by_future_user_search_behaviour_20200412_20200413.csv',
 'group_by_future_user_search_behaviour_20200412_20200414.csv',
 'group_by_future_user_search_behaviour_20200412_20200415.csv',
 'group_by_future_user_search_behaviour_20200412_20200416.csv',
 'group_by_future_user_search_behaviour_20200412_20200417.csv',
 'group_by_future_user_search_behaviour_20200412_20200418.csv',
 'group_by_future_user_search_behaviour_20200412_20200419.csv']
排序的同时返回索引
参考
L = [2,3,1,4,5]
from operator import itemgetter
indices, L_sorted = zip(*sorted(enumerate(L), key=itemgetter(1)))
list(L_sorted)
>>> [1, 2, 3, 4, 5]
list(indices)
>>> [2, 0, 1, 3, 4]本质上是把enuemrate的输出5个tuple按照key(即第一个变量)进行排序, 然后再用zip(*)实现解压, 变回两个tuple, 更直接的方法是再套一个map, 注意map的第一个参数是function, 第二个才是iterable object!!!!!
In [1]: L = [2,3,1,4,5]
   ...: from operator import itemgetter

In [2]: zip(*sorted(enumerate(L), key=itemgetter(1)))
Out[2]: <zip at 0x154dddb2848>

In [4]: s, r = map(list, zip(*sorted(enumerate(L), key=itemgetter(1))))

In [5]: s
Out[5]: [2, 0, 1, 3, 4]

In [6]: r
Out[6]: [1, 2, 3, 4, 5]
同时也要注意, 返回的indices是从1开始的!!, 而不是0
* 与 **的用法
参考:
what-does-double-star-asterisk-and-star-asterisk-do-for-parameters
*的两种用法
- 用于*args 或者 **kwargs
- 用于 unpack iterables,比如*list等价于把list中的内容摊开
查看module位置:__file__
import dgl
print(dgl.__file__)
/home/weitaotang/.local/lib/python3.6/site-packages/dgl/__init__.py
更改module导入的顺序:修改PYTHONPATH
导入sys模块,然后通过sys.path修改。
import sys
p = sys.path
temporary = p.pop(-4)
p.append(temporary)
如此就成功把原来的
conda rename env:只能先复制再删除
参考:
how-can-i-rename-a-conda-environment)
conda create --name new_name --clone old_name
conda remove --name old_name --all
conda env在jupyter lab中显示
参考
kernels-for-different-environments
conda-environments-not-showing-up-in-jupyter-notebook
source activate myenv
python -m ipykernel install --user --name myenv --display-name "Python (myenv)"
logging的时候更改写入模式: FileHandler的mode参数
默认是mode = a即每一次都追加到最后,如果要每一次都重新打开新的文件就用w吧
把tuple变回list
*能够把list摊开来(变成一个个tuple),然后用zip把它们拼起来
zip(*list)离散的indices(arbitrary indices)
按照离散的indices 获取list中的index
逐个返回然后拼起来
idx = [l.index(item) for item in query_list]用离散的indices来索引
用
*辅助,默认返回是tuple,再加上一个listfrom operator import itemgetter query_list = [5, 4, 8] original_list = list(range(10)) item_wanted = list(itemgetter(*query_list)(original_list))用
map辅助,同样在外面套上list。适用于提取tuple中的item作为key>>> inventory = [('apple', 3), ('banana', 2), ('pear', 5), ('orange', 1)] >>> getcount = itemgetter(1) >>> list(map(getcount, inventory)) [3, 2, 5, 1] >>> sorted(inventory, key=getcount) [('orange', 1), ('banana', 2), ('apple', 3), ('pear', 5)]
查看object的attribute
通过__dict__
isinstance(val_subdataset, object)
Out[76]: True
val_subdataset.__dict__.keys()
Out[77]: dict_keys(['data', '_original_labels', 'original_index', 'labels'])通过vars(实际也是查看__dict__)
isinstance(val_subdataset, object)
Out[78]: True
vars(val_subdataset).keys()
Out[79]: dict_keys(['data', '_original_labels', 'original_index', 'labels'])没有__dict__的报错:
vars(self.g_list)
Traceback (most recent call last):
  File "/home/weitaotang/.conda/envs/tfpt_cpu/lib/python3.6/site-packages/IPython/core/interactiveshell.py", line 3326, in run_code
    exec(code_obj, self.user_global_ns, self.user_ns)
  File "<ipython-input-74-c79c10a82ac7>", line 1, in <module>
    vars(self.g_list)
TypeError: vars() argument must have __dict__ attribute通过__dir__() 或者dir() 列出全部
val_subdataset.__dir__()
Out[80]:
['data',
 '_original_labels',
 'original_index',
 'labels',
 '__module__',
 '__init__',
 '__len__',
 '__getitem__',
 'getitem_o',
 'update_labels',
 'original_labels',
 '__doc__',
 '__add__',
 '__dict__',
 '__weakref__',
 '__repr__',
 '__hash__',
 '__str__',
 '__getattribute__',
 '__setattr__',
 '__delattr__',
 '__lt__',
 '__le__',
 '__eq__',
 '__ne__',
 '__gt__',
 '__ge__',
 '__new__',
 '__reduce_ex__',
 '__reduce__',
 '__subclasshook__',
 '__init_subclass__',
 '__format__',
 '__sizeof__',
 '__dir__',
'__class__']dir(val_subdataset)
Out[81]:
['__add__',
'__class__',
'__delattr__',
'__dict__',
'__dir__',
'__doc__',
'__eq__',
'__format__',
'__ge__',
'__getattribute__',
'__getitem__',
'__gt__',
'__hash__',
'__init__',
'__init_subclass__',
'__le__',
'__len__',
'__lt__',
'__module__',
'__ne__',
'__new__',
'__reduce__',
'__reduce_ex__',
'__repr__',
'__setattr__',
'__sizeof__',
'__str__',
'__subclasshook__',
'__weakref__',
'_original_labels',
'data',
'getitem_o',
'labels',
'original_index',
'original_labels',
'update_labels']判断dict是否用某key:用in
if key is in dictIpdb/pdb条件断点设置
break line_number, conditionor
b line_number, condition参考:
pdb-ipdb-for-python-break-on-editable-condition
Argparser 部分使用技巧
args以dict形式返回:vars()
参考:
args = parser.parse_args()
print(vars(args))
Partial parse:.parse_known_args
还会把无法解析的args一并返回到一个list里面
部分parse(remove unnecessary args):通过dict删除或者用sub parser
# Ignore args by dict
args = dict((k, v) for k,v in vars(args) if v is not None) # Ignore items that are None
pdb/ipdb 在其他文件添加断点
pdb-set-a-breakpoint-on-file-which-isnt-in-sys-path
b(reak) [[filename:]lineno | function[, condition]]b /path/to/module.py:34
> Breakpoint 1 at /path/to/module.py:34获取variable的name
不可能,因为可能多个name都对应到同一个variable,那这个name就不是唯一的了
https://stackoverflow.com/q/18425225
获取相对路径:
参考这个
ValueError: attempted relative import beyond top-level package
python 同级目录包import问题,使用”.”错误
参考最后的3:python 同级目录包导入问题,使用”.”错误
额外参考:Hitchhiker’s guide to the Python imports
使用shell文件来运行python文件:注意路径
当使用shell script,在script其中输入python xxx.py指令时,此时'.'对应的是 shell script的目录,而不是python script的目录
更改文件路径到当前目录:
思路:获取当前路径的dirname,然后chdir即可
os.chdir(os.path.dirname(os.path.abspath(__file__)))
argparser使用bool的问题:
https://stackoverflow.com/questions/15008758/parsing-boolean-values-with-argparse/19233287
type=bool是不行的,所有字符默认都被cast成True,即无论输入什么参数这个选项都会是True因此需要单独设置:
可以通过设置两个exclusive的选项,分别store_true, store_false
也可以通过设置choise,先默认成str,然后再用if语句映射:
if 'pydev_debug' in args:
    if args['pydev_debug'] == 'True':
        args['pydev_debug'] = True
    else:
        args['pydev_debug'] = False
获取object的大小
python内建的object的大小:sys.getsizeof()
numpy array的大小
array.size * array.itemsize在多个module(file)之间共享变量
参考
可以把所有需要共享的变量都放在一个py文件(一个module)中,然后其他各个需要用到这些变量的py文件都import这个module,如此就能实现复用。
multiple line string的做法:
Pythonic way to create a long multi-line string
如果要跨行显示,用
"""\ """"print("""\ Usage: thingy [OPTIONS] -h Display this usage message -H hostname Hostname to connect to """)如果只是因为单行太长,需要分开成几行来写(本质就是自动concat)
s = ("this is a very"
    "long string too"
    "for sure ..."
    )
txt文件IO读取
参考:
IO读取 IO读取,十分详细
- 推荐用
with方法来open文件,这样能够自动close - open文件后,可以按照逐行读取,或者按照字节读取等方法。对于逐行读取来说,可以按照以下的方法来:
- 用
for line in - 用while循环来
- 用
对dict排
参考:
按照dict的key值排序
- 还是用dict
很简单,如下的一行式即可
new_dict = {k:dict[k] for k in sorted(dict.keys())}- 直接用OrderedDict
直接用OrderedDict的好处就是能够 保持插入的顺序
new_dict = OrderedDict(sorted(dict.items()))按照dict的value值排序
https://stackoverflow.com/a/613218
x = {1: 2, 3: 4, 4: 3, 2: 1, 0: 0}
{k: v for k, v in sorted(x.items(), key=lambda item: item[1])}
{0: 0, 2: 1, 1: 2, 4: 3, 3: 4}
python中删除文件
shutil.rmtree 函数 OSError: [Errno 39] Directory not empty: 错误原因
- 删除单一文件:
os.remove(path) - 删除 空目录:
os.rmdir()或者os.removedirs() - 整个目录与文件夹都删除:
shutil.rmtree()其中对于Errno39的错误,需要 手动close了文件才行
nonlocal和global的区别
Accessing a variable from outer scope via global keyword in Python
注意:nonlocal是从python3开始有的,python2并没有!
nonlocal主要用在nested function中,global用在py文件中(即module level)
因此根据上述,如下的用法才是正确的:
global的用法
A = 1

def global_func():
global A
A = 2

def func():
A = 3

print(A)
# 1

global_func()
print(A)
# 2

func()
print(A)
# 2
nonlocal的用法:
def outside():
a = 1

def inside_nonlocal():
    nonlocal a
    a = 2

def inside():
    a = 3

print(a)
# 1

inside_nonlocal()
print(a)
# 2

inside()
print(a)
# 2
切换了conda环境后,ipython的指向不正确
参考:IPython in a conda environment calls the wrong python
直接用hash -r即可
递归地遍历获得某个文件夹(及其子文件夹)所有的文件
参考:
def get_files(path, all_files):
    file_list = os.listdir(path)
    for file in file_list:
        cur_path = os.path.join(path, file)
        if os.path.isdir(cur_path):
            get_files(cur_path, all_files)
        elif os.path.isfile(file):
            all_files.append(file)

    return all_files
还可以加入正则表达式进行文件筛选:
def get_files(path, all_files, pattern):
    file_list = os.listdir(path)
    for file in file_list:
        cur_path = os.path.join(path, file)
        if os.path.isdir(cur_path):
            get_files(cur_path, all_files)
        elif re.match(pattern, file):
            all_files.append(file)

return all_files或者直接用os.walk
topdown为True表示从根目录到子目录输出,否则从子目录开始
root_dir = '../res/group_by_future_user_search_result/'
files_name = []
for root, dirs, files in os.walk(root_dir, topdown=True):
  # 同时输出文件名和文件夹
    for name in files:
        print(os.path.join(root, name))
        files_name.append(name)
     for name in dirs:
         print(os.path.join(root, name))

files_name_sorted = sorted(files_name, key=lambda x:(x.split('_')[-2], x.split('_')[-1]))
os.walk 排除文件夹
Excluding directories in os.walk
需要注意:
- 必须要用inplace的方式对
dirs进行修改,而不能直接赋值,即必须使用:
dirs[:] = [d for d in dirs if d not in exclude]利用re模块同时利用多个分隔符
基本和
str.split()用法相同,但是要注意re.split()很多分隔符需要转义,但是str.split()不需要,如\.vs.
分隔符使用如下:
- 单个分隔符:
[.] - 多个分隔符:
.|/
- 单个分隔符:
example:
同时筛选
\\和.re.split('\\\|\.', string)
用正则表达式筛选list
filter函数加list
result = list(filter(lambda x: re.match(pattern, x) != None, unfiltered_list))二维数组的初始化
要小心, 不能用[None] * 5这种方式, 因为这样会让数组之间有关联性, 会导致想修改一个cell的时候, 结果变成对一整列的值都进行了修改.
具体原因是因为在第二维乘的时候(即[[None] *5] *3中的3)时, 会让各个维度都指向第一个数组[None] * 5, 即它们都是第一维度的浅拷贝, 所以任何一列都是指向同一个
In [47]: dp=[[False]*5]*5

In [48]: print(dp)
[[False, False, False, False, False], [False, False, False, False, False], [False, False, False, False, False], [False, False, False, False, False], [False, False, False, False, False]]

In [49]: dp[0][0] = 1

In [50]: print(dp)
[[1, False, False, False, False], [1, False, False, False, False], [1, False, False, False, False], [1, False, False, False, False], [1, False, False, False, False]]

In [51]: dp[2][3] = 1

In [52]: print(dp)
[[1, False, False, 1, False], [1, False, False, 1, False], [1, False, False, 1, False], [1, False, False, 1, False], [1, False, False, 1, False]]正确的做法应该是**[[None for _ in range(5)] for _ in range(5)]**
defaultdict
和 dict差不多, 主要在于对于构造函数做了改变, 能够实现在某个key不存在的情况下自动按照确定的函数进行初始化, 官方的一个例子就是用于记数, 这个非常有效:
s = 'mississippi'
d = defaultdict(int)
for k in s:
    d[k] += 1

sorted(d.items())
>>>[('i', 4), ('m', 1), ('p', 2), ('s', 4)]
lambda函数并不接受tuple argument
下面的函数:
lambda (k, v): (k, v[1])在python中并不合法,会直接报错
而下面这种则会提示缺少参数(因为传入的tuple只对应一个参数)
lambda k, v: (k, v[1])具体的做法用下面的方式:
- 用
itemgetter - 或者直接传入一整个参数,后面indexing即可
from operator import itemgetter

records = [('bob', 35, 'manager'), ('sue', 40, 'developer')]

ages1 = list(map(lambda x: x[1], records))   # [35, 40]
ages2 = list(map(itemgetter(1), records))    # [35, 40]
print list的时候自动换行,美化输出
参考 数据美化输出
直接用pprint.pprint()即可
eval可用于计算表达式, exec 可用于赋值
In [143]: tt1= eval('{1:2,3:4}')

In [144]: tt1
Out[144]: {1: 2, 3: 4}但是直接用eval来赋值就会报错:
In [145]: eval('dist_ssss={1:2,3:4}')
Traceback (most recent call last):

  File "/usr/local/Caskroom/miniconda/base/envs/py37/lib/python3.7/site-packages/IPython/core/interactiveshell.py", line 3331, in run_code
    exec(code_obj, self.user_global_ns, self.user_ns)

  File "<ipython-input-145-844f9625b034>", line 1, in <module>
    eval('dist_ssss={1:2,3:4}')

  File "<string>", line 1
    dist_ssss={1:2,3:4}
             ^
SyntaxError: invalid syntax此时一个用exec来赋值
In [146]: exec('dist_ssss={1:2,3:4}')

In [147]: dist_ssss
Out[147]: {1: 2, 3: 4}获取文本的最后一行:直接用readlines()然后取最后一个元素
注意:
- 这种方法不能处理太大的文本,因为
readlines()是迭代器,直接把这个文件读入内存
with open('./full_preclick_{}_{}.txt'.format(date, hour), 'r') as f:
  	last_line = f.readlines()[-1]
生成器逐行读取文件的方法
python readline()逐行读,怎么判断已到末尾?
with open("file") as fh:
    for line in fh:
        print(line.strip())
with open("file") as fh:
line = fh.readline()
while line:
print(line.strip())
line = fh.readline()获取给定目录下的所有文件
递归地获得(遍历所有子目录):os.walk()
In [31]: ll
total 4
drwxr-xr-x 2 tangweitao.walter 4096 Jun 10 11:43 ddd/
-rw-r--r-- 1 tangweitao.walter    0 Jun 10 11:43 res_22

In [32]: pwd
Out[32]: u'/data00/home/tangweitao.walter/Download/test_res'

In [33]: for i, j, k in os.walk('/data00/home/tangweitao.walter/Download/test_res'):
    ...:     print(i, j ,k)
    ...:
('/data00/home/tangweitao.walter/Download/test_res', ['ddd'], ['res_22'])
('/data00/home/tangweitao.walter/Download/test_res/ddd', [], [])
对每一个文件夹都进行遍历,返回当前文件夹的绝对路径,包含的子文件夹,包含的文件
只列出所有文件夹/文件名: os.listdir()
In [34]: os.listdir('/data00/home/tangweitao.walter/Download/test_res')
Out[34]: ['ddd', 'res_22']
在python中执行shell命令
使用Popen
一个比较好的例子, 无需split:
cmd='wc . -l'
child = Popen(cmd, shell=True, stdout=subprocess.PIPE, stderr=subprocess.PIPE)
将输入的命令(字符串)分隔成shell-like syntax: shlex.split
shlex 模块
看看是否成功执行
看returncode
cmd='wc . -l'
child = Popen(cmd, shell=True, stdout=subprocess.PIPE, stderr=subprocess.PIPE)

if child.returncode == 0:
	print('Success!')
else:
	print('Failed')
查看结果
- 默认是直接输出到标准输出,即主进程的stdout(屏幕)
重定向至管道PIPE
- 如果需要对输出进行单独的处理,需要重定向到PIPE,然后就能用
prc.stdout或者prc.stderr,类似文件那样进行读写处理(即能够使用.read,readline,readlines)
proc = Popen(cmd, stdout=PIPE)
while True:
    line = proc.stdout.readline()
    if not line:
        break
    if re.match(r'\d+|instance', line):
print(line)- 如果没有重定向到PIPE,直接按照文件对象那样进行读写会报错:
# 只把stderr重定向到管道,而没有把stdout重定向到管道
proc = Popen(cmd, stderr=PIPE)
while True:
    line = proc.stdout.readline()
    if not line:
        break
    if re.match(r'\d+|instance', line):
        print(line)
此时对应的stdout应该是None:

重定向到管道之后,使用
communicate将返回一个tuplestdout, stderr,分别对应前面子进程的两个管道,注意:只有在Popen的时候使用了PIPE的输出,使用
communicate才会获得对应的结果,否则是None,如例子中的stdout将会是None# stdout将会是None,因为已经输出到默认的标准输出(屏幕) proc = Popen(cmd, stderr=PIPE) stdout, stderr = proc.communicate输出到PIPE之后,如果在使用communicate前尝试进行了读(read),这部分被读的数据将不会进入communicate的返回中(因为已经被读取了)
# stdout将会少了开头的50行 proc = Popen(cmd, stderr=PIPE) for _ in range(50): proc.stdout.readline() stdout, stderr = proc.communicate如果没有使用communicate,而是直接不断地read/readline,将可能导致堵塞,如下面的这段代码,详细原因看后文 Popen(PIPE)阻塞,很重要的问题!!!,因此不建议这样
proc = Popen(cmd, stdout=PIPE, stderr=PIPE)
while proc.poll() is None:
    line = proc.stdout.readline() # 将可能导致堵塞
    if not line:
        break
    # print(line)
    if re.match(r'\d+|instance', line):
        print(line)
    print(count)
    count += 1
Popen(PIPE)阻塞,很重要的问题!!!
Popen.wait()和Popen.communicate()的区别
当stdout和/或stderr被重定向到PIPE的时候,使用wait将可能导致deadlock(详细原因见下文 Popen(PIPE)阻塞)主要就是系统默认的PIPE大小是有限的(可以通过ulimit -a查看到),当cmd的输出直接将PIPE塞满之后,没办法继续写入,后面的read的代码也没办法执行到,因此会导致阻塞的情况出现。
而使用communicate就不会有这种情况,但由于communicate是直接缓存入内存,输出不能太大,否则直接OOM
为了解决这个问题, Popen有一个communicate方法, 这个方法会将stdout和stderr数据读入到内存, 并且会一直独到两个流的结尾(EOF). communicate可以传入一个input参数, 用来表示向stdin中写入数据, 可以做到进程间的数据通信.
注意: 官方文档中提示, 读取的数据是缓存在内存中的, 所以当数据量非常大或者是无限制的时候, 不要使用communicate, 应该会导致OOM.
一般情况下, stdout和stderr数据量不是很大的时候, 使用communicate不会导致问题, 量特别大的时候可以考虑使用文件来替代PIPE, 例如stdout=open(“stdout”, “w”)
原因和解决方法
查看python的源码发现,如果设置了stdout或stderr,subprocess就会调用os.pipe创建一个管道用于其和子进程之间的通信,而上面的问题正好是cmd输出的数据把pipe塞满,无法继续往pipe里写入数据导致程序hang住,而我们没有去读出pipe数据,而是死等子进程完成,导致死锁。
上面这种情况产生的原因就是:
- cmd输出的数据太多
- 后续没有从pipe(stdout)中读取数据进行消费
但是哪怕有用read,仍然是有可能出现阻塞的情况:
python popen.stdout.read阻塞 解决办法

Understanding Popen.communicate
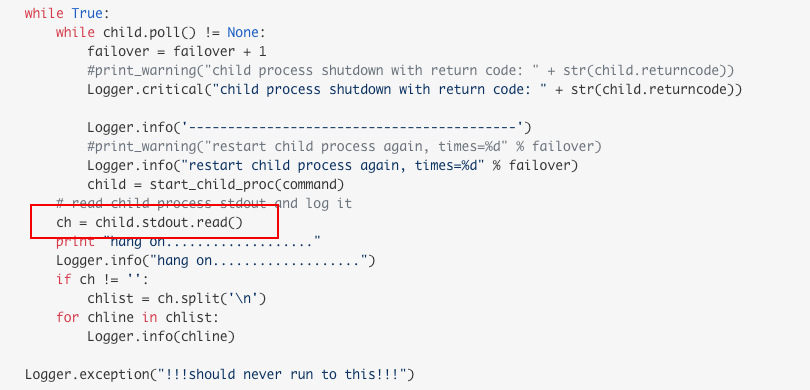
p.stdout.read()hangs forever because it tries to read all output from the child at the same time as the child waits for input (raw_input()) that causes a deadlock.
因为:
- read的语句可能也被阻塞了(child process一直没办法把输出打入stdout)
- read不加参数的情况下,默认把所有输出一起读入,容易出错
pipe large amount of data to stdin while using subprocess.Popen
If you don’t want to keep all the data in memory, you have to use select.
即便能到read或者readline的语句,也可能由于管道中已经为空,此时尝试read或者readline导致阻塞:
live output from subprocess command
Or you can create a
readerand awriterfile. Pass thewriterto thePopenand read from thereader即存到一个文件中,然后不断重该文件读入,输出到stdout中
import io
import time
import subprocess
import sys

filename = 'test.log'
with io.open(filename, 'wb') as writer, io.open(filename, 'rb', 1) as reader:
    process = subprocess.Popen(command, stdout=writer)
    while process.poll() is None:
        sys.stdout.write(reader.read())
        time.sleep(0.5)
    # Read the remaining
    sys.stdout.write(reader.read())
When you use
PIPE,readandreadlinefunctions will block until either one character is written to the pipe or a line is written to the pipe respectively.
总结下来的解决方法:
- 不在子进程运行的过程中使用read或者readline,而是直接使用
.communicate,但这样无法实现实时读取,同时在输出非常大的情况下并不好 - Popen中把stdout指定为一个文件,同时再另外设一个reader不断读该一个文件,但这样后续只能从文件读写了,传输也只能传输文件,同样也可以流式输出,而且可以避免read和readline的阻塞
- 使用select,实时流式处理输出,详细见下文
Popen流式的stdout/stderr输出
其中描述了卡死的现象原因,两种解决的方法,以及最后的调优思路:
有个bufsize的参数, 这个默认是0, 就是不缓存, 1表示行缓存, 其他正数表示缓存使用的大小, 负数-1表示是使用系统默认的缓存大小.
在运行性能遇到问题时, 可能是缓存区未开启或者太小, 导致了子进程被卡住, 效率低下, 可以考虑配置为-1或4096.
需要实时读取stdout和stderr的, 可以查阅[参考2], 使用select来读取stdout和stderr流.
合并字典(类似spark reduceByKey)的方法
Is there any pythonic way to combine two dicts (adding values for keys that appear in both)?
print重定向到文件
- 直接在bash的command里面重定向:
python .... > output_log- 在python里面将重定向文件赋值给stdout
import sys
sys.stdout = open("c:\\goat.txt", "w")
print ("test sys.stdout")
实时地写入(刷新)重定向文件
python stdout to file does not respond in real time
不论是在bash中实时地输出,还是说通过stdout重定向,都需要:
sys.stdout.flush()将多个元素(文件夹)用os.path.join()拼起来
Join elements of a list into a path
list=['L:', 'JM6', 'jm6', 'test', 'turb', 'results', 'v6.2', 'examples']
os.path.join(*list)
Popen实现超时关闭子进程
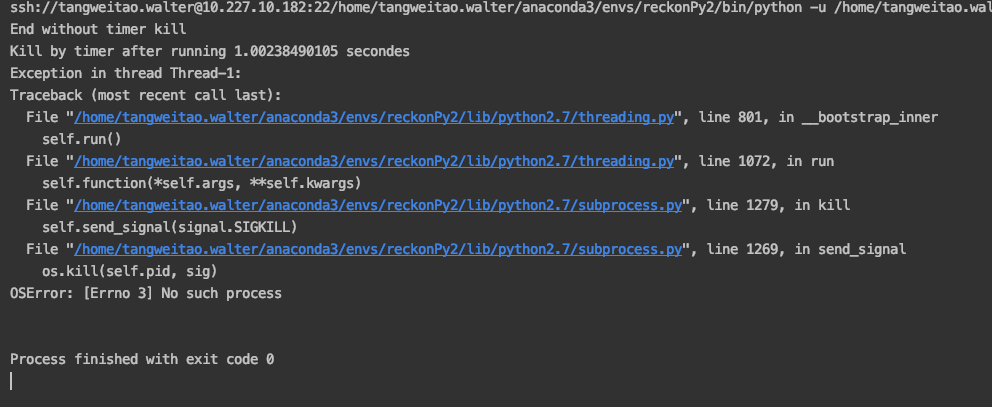
错误做法:使用threading.Timer,实测不可行
Using module ‘subprocess’ with timeout
但是实际执行起来会一直有No such process的问题,具体原因参考 Running a Time-Limited Subprocess In Python (concurrency caveats inside!)

正确做法:使用thread,和thread.terminate()
what about running the process in a separate thread?
# coding=utf-8
import threading
import subprocess
import traceback
import shlex


class Command(object):
    """
    Enables to run subprocess commands in a different thread with TIMEOUT option.
    Based on jcollado's solution:
    http://stackoverflow.com/questions/1191374/subprocess-with-timeout/4825933#4825933
    """
    command = None
    process = None
    status = None
    stdout, stderr = '', ''

    def __init__(self, command, logger=None):
        if isinstance(command, str):
            command = shlex.split(command)
            # print(command)
        self.command = command
        self.logger = logger

    def run(self, timeout=None, **kwargs):
        """ Run a command then return: (status, output, error). """

        def target(**kwargs):
            try:
                self.process = subprocess.Popen(self.command, **kwargs)
                self.stdout, self.stderr = self.process.communicate()
            except:
                self.stderr = traceback.format_exc()
            self.status = -self.process.returncode

        # default stdout and stderr
        if 'stdout' not in kwargs:
            kwargs['stdout'] = subprocess.PIPE
        if 'stderr' not in kwargs:
            kwargs['stderr'] = subprocess.PIPE
        # thread
        thread = threading.Thread(target=target, kwargs=kwargs)
        thread.start()
        thread.join(timeout)
        if thread.is_alive():
            if self.logger:
                self.logger.info('Kill process')
            else:
                print('Kill process')
            self.process.terminate()
            thread.join()

        return self.status, self.stdout, self.stderr


if __name__ == '__main__':
    command = Command("sleep 2")
    print(command.run(timeout=3))
    print(command.run(timeout=1))
同时注意,python的returncode为负数时,表示被SIGNAL N,如返回-15,对应SIGTERM
kill整个进程组
上述做法中只能kill掉Popen的那个进程,并不能kill掉整个process(最多到子进程,无法处理子进程的进程,即grandchild process)。
最典型的例子就是传入的cmd是调用另一个bash脚本,而bash脚本中又调用了其他参数,此时直接低啊用上面的脚本将导致grandchild process无法被kill掉,导致一直没有结束。
而正确的做法应该如 How to terminate a python subprocess launched with shell=True,通过杀死整个进程组来实现kill。但要注意:
- Popen必须传入新的参数
preexec_fn=os.setsid,使得这个Popen所对应的process(即开启bash脚本的那个process)成为进程组的父进程:
For that, you should attach a session id to the parent process of the spawned/child processes, which is a shell in your case.This will make it the group leader of the processes. So now, when a signal is sent to the process group leader, it’s transmitted to all of the child processes of this group.
- 使用
os.killpg+signal.SIGTERM
最后的代码:
# coding=utf-8
import threading
import subprocess
import traceback
import shlex
import os
import signal


class Command(object):
    """
    Enables to run subprocess commands in a different thread with TIMEOUT option.
    Based on jcollado's solution:
    http://stackoverflow.com/questions/1191374/subprocess-with-timeout/4825933#4825933
    """
    command = None
    process = None
    status = None
    stdout, stderr = '', ''

    def __init__(self, command, logger=None):
        if isinstance(command, str):
            command = shlex.split(command)
        self.command = command
        self.logger = logger

    def run(self, timeout=None, **kwargs):
        """ Run a command then return: (status, output, error). """

        def target(**kwargs):
            try:
                # 传入preexec_fn
                self.process = subprocess.Popen(self.command, preexec_fn=os.setsid, **kwargs)
                self.stdout, self.stderr = self.process.communicate()
            except:
                self.stderr = traceback.format_exc()
            self.status = -self.process.returncode if self.process.returncode < 0 else self.process.returncode

        # default stdout and stderr
        if 'stdout' not in kwargs:
            kwargs['stdout'] = subprocess.PIPE
        if 'stderr' not in kwargs:
            kwargs['stderr'] = subprocess.PIPE
        # thread
        thread = threading.Thread(target=target, kwargs=kwargs)
        thread.start()
        thread.join(timeout)
        if thread.is_alive():
            # 不再使用kill
            os.killpg(os.getpgid(self.process.pid), signal.SIGTERM)
            thread.join()
            if self.logger:
                self.logger.info('Kill process due to time limit')
            else:
                print('Kill process due to time limit')

        return self.status, self.stdout, self.stderr


if __name__ == '__main__':
    command = Command("sleep 2")
    print(command.run(timeout=3))
    print(command.run(timeout=1))
添加timeout + retry操作
参考 func-timeout 4.3.5的介绍
from func_timeout import func_timeout, FunctionTimedOut

...

try:

	doitReturnValue = func_timeout(5, doit, args=('arg1', 'arg2'))

except FunctionTimedOut:
	print ( "doit('arg1', 'arg2') could not complete within 5 seconds and was terminated.\n")
except Exception as e:
	# Handle any exceptions that doit might raise here
例子
比如下面这个,就retry了一次,如果想retry多次,可以手动for循环然后成功之后break loop
if epoch % self.save_period == 0 or best:
    timeout = 300
    timeout_exception = None
    try:
        func_timeout(timeout, self._save_checkpoint, kwargs={'epoch': epoch, 'save_best': best})
    except FunctionTimedOut as fte:
        self.logger.warning('Failed to save checkpoint of epoch {}'.format(epoch))
        timeout_exception = fte

    if timeout_exception:
        try:
            timeout_exception.retry(timeout * 2)
        except FunctionTimedOut:
            self.logger.warning('Failed to save checkpoint of epoch {} for second trial' +
                                'with double timeout'.format(epoch))